How to make laminated placemats?
Louis MikolajczakHow to Make Laminated Placemats: Step-by-Step Methods, Design Ideas, and Bubble-Free Tips for Long-Lasting Results
How to make laminated placemats without the hassle, but with a clean and durable finish? This guide shows you two effective methods: thermal laminator (pouches) and cold lamination (adhesive films). You'll see how to choose the thickness, prepare a clean template, avoid bubbles, seal watertight edges, and clean without dulling the film. The goal: to make sturdy, easy-to-maintain placemats , in the right size for your plates and glasses, with a clean result from the first try.
Material, formats & thicknesses
Gather the essentials before you start. You'll save time and the finish will be better.
- 80/100/125 micron laminating pouches (A4, A3, or custom size).
- Thermal laminator with thickness/temperature adjustment or adhesive films (cold lamination).
- Printed media : 160–250 g/m² coated paper or satin photo paper.
- Tools : paper cutter or cutter + metal ruler, cutting mat, microfiber cloth, squeegee (rigid card), set square, thin pencil.

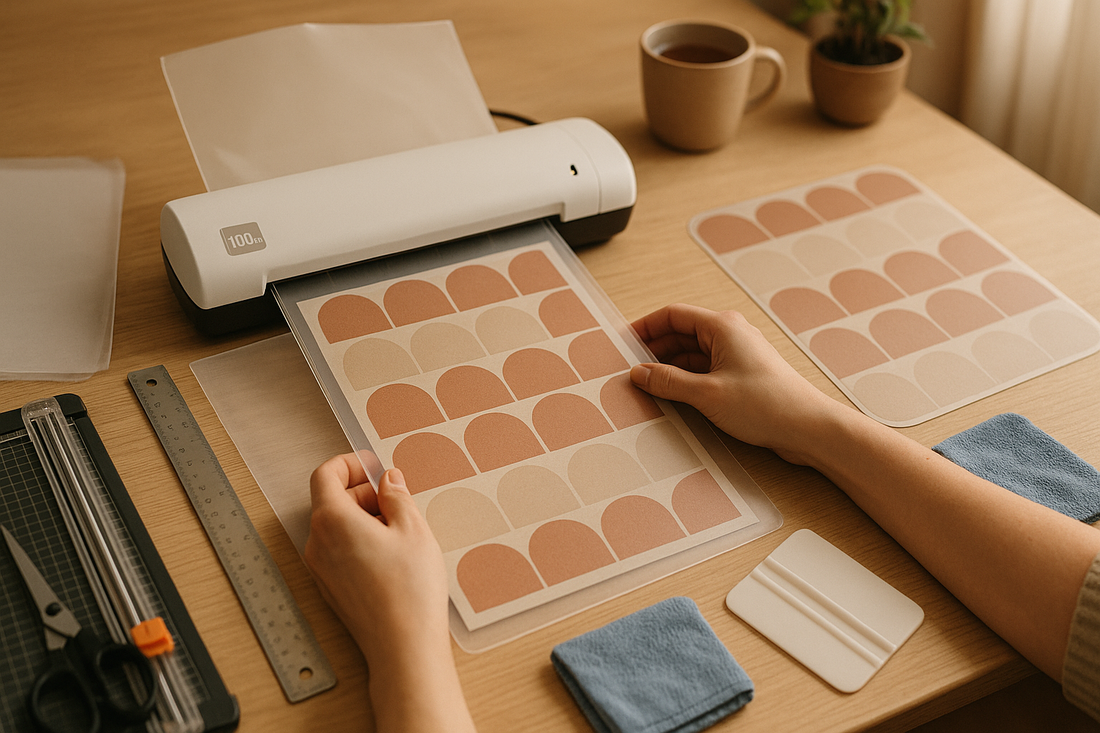
Step by Step — Thermal Laminator in Action
Recommended table size: 40 x 28 cm . It fits a standard place setting without getting in the way of arms or encroaching on table joints. If you have a small round table, consider a diameter of 35–38 cm .
Paper, inks & rendering
Paper that is too thin will curl, paper that is too thick may not seal properly. Stay between 160 and 250 g/m² . Inkjet inks require 5–10 minutes of drying time before laminating, especially on dark solid areas. Laser printing is more resistant to humidity but may leave a slight relief: test before printing. To preserve the colors, avoid prolonged exposure to direct sunlight and choose a satin film which better masks micro-scratches.
Thickness according to use
Family life, restaurants, children's activities: 100–125 µ for firm rigidity, clean corners, and easy cleaning. One-off events or large, economical production runs: 80 µ is sufficient, provided you maintain a sealed margin of 3–5 mm all around. If you're unsure how to make durable yet flexible laminated placemats , the satin 100 µ is the best compromise.
Cutting quality & storage
A rotary blade cutter produces smooth, burr-free edges. Use a corner rounder for increased safety and reduced wear. Store the sets flat , away from heat sources (radiators, ovens) to avoid any gradual curvature.
Set design, margins & templates
A successful set starts with a precise template. Keep it simple and clear: plate area, glass space, visual centered or aligned on the plate.
Create a clean template
Draw a rectangle 40 × 28 cm (or Ø 35–38 cm for a round table). Add 10 mm bleed if the print goes all the way to the edge. Place the main graphic in the center or on the plate side. Leave 6–8 cm free at the top right for the glasses and gesture.
Clean printing
Print in high quality on 160–250 gsm. Let it dry, then dust with a dry microfiber cloth to remove dust and fibers. For a consistent run, create a master file with your margins, crop marks, and variable names.
- Children's style : first names, fork/spoon markers, light background, legible typography.
- Decorative style : geometric patterns, short palette (2–3 colors), sufficient text/background contrast.
Composition tip: Keep the same outer film margin (3–5 mm) for a visually harmonious collection.
Method 1: Thermal Laminator (Step by Step)
This is the cleanest and most durable solution. The film heat seals and protects against stains (water, sauce, washable markers).
| Thickness | Recommended use | Rigidity | Appearance | Notes | Indicative budget |
|---|---|---|---|---|---|
| 80 µ | Events, major economic series | Flexible | Glossy or satin | 4–5 mm margin recommended | € |
| 100 µ | Daily life at home | Average | Glossy/satin | Good compromise, goes everywhere | €€ |
| 125 µ | Restaurants, intensive, children | Farm | Satin recommended | Very clean corners, easy cleaning | €€€ |
Guideline chart. Always follow your laminator's recommendations for thickness and temperature.
Step by step
1) Preheat the laminator by selecting the thickness (80/100/125 µm). Wait for the “ready” light.
2) Prepare the pouch : open on the fold side. Dust off the artwork. Center it, keeping 3–5 mm of film visible all around.
3) Insert the folded edge first. Hold the pouch (not the paper) and let the machine feed.
4) Let it come out flat on a clean surface. Do not pull or bend the hot film.
5) Check the weld: if necessary, repeat only once after 30 seconds.
Cleanliness: Clean the table, the laminator inlet and handle by the edges . A wipe with an antistatic microfiber cloth reduces 90% of visible dust under the film.
Cutting, corners & safety
Trim with a paper cutter if necessary, leaving at least a 3 mm sealed margin . Without this margin, the film will open during use.
Round corners (rounding pliers). Improved comfort and durability.
Cleaning : warm water + microfiber cloth. Grease: a drop of dish soap, rinse, dry. Avoid strong and abrasive solvents.
Mass production without loss
For a stack of 6–12 sets, prepare all the artwork, check the margins, then run at a steady pace. Slide a cardboard guide sheet in at the beginning to stabilize the feed. Let each set cool flat before stacking to avoid heat marks. If your machine accepts a document pocket , use it to limit shifting and protect the rollers.
Method 2: Cold lamination (without machine)
Ideal without a laminator or for a soft matte finish. Adhesive films are applied at room temperature and are available in permanent or repositionable versions.
Prepare the “sandwich”
Cut two rectangles of film larger than the graphic (at least +15 mm). Peel back 5–6 cm of the protection from the first film, align at the top of the graphic, then gradually smooth down with a soft squeegee, 2–3 cm at a time. Turn over and apply the second film to the back if you want a double-sided set.
Clean finishes
Cut, leaving 3–4 mm of bare film all around for sealing. Round the corners. Move the squeegee outwards to seal the edges. To release a bubble, micro-needle at the edge + pressure towards the exit.
Choosing the right movie
Soft matte: low glare, less visible streaks. Glossy: vibrant colors but more pronounced marks. Repositionable films are more forgiving of mistakes but adhere a little less strongly in the long term; permanent films hold better in heat and warm water.
Identical maintenance as the thermal version. Avoid very hot water and harsh products. For professional use, test a set for 24 hours in the refrigerator and then at room temperature to check for delamination.

Result — Laminated set ready to use (100 µm satin film)
Conclusion & Quick Memo
Now you know how to make clean, durable, and easy-to-use laminated placemats . A thermal laminator offers the best seal and a premium finish, especially at 100–125 µm. Cold lamination works very well, with a chic matte finish and no need for a machine. In both cases, the key is preparation : a clean surface, even margins, rounded corners, and a clear template.
Final Memo
1) 40 × 28 cm template, clean visual margin, 160–250 g/m² paper. 2) Dust everything. 3) Thermal: centered visual, 3–5 mm sealed margin, flat output. 4) Cold: progressive application, patient marouflage, 3–4 mm margin. 5) Rounded corners, gentle cleaning, flat storage.
For a family series, create a master file with your margins and markers: you will only have to change the first names or the motif and launch production.